Detecting Lane Changes
In this guide, we will use Vaas to detect lane changes in dashboard camera footage from the Berkeley DeepDrive dataset (BDD). We assume you have already deployed Vaas.
Data
First, we need to obtain the dashcam video data. If you like, you can download the entire dataset (200K one-minute clips) and import it into Vaas, but to make things easier, we've prepared a Vaas export with around 300 clips.
- Download our export at https://favyen.com/vaas-data/bdd-subset-export.zip.
- In your Vaas deployment, go to the Timelines tab and press "Import Timeline from Export".
- Select the Upload option, and upload the zip file.
You should now see one timeline called "bdd-video" with two data series, "bdd-video" and "bdd-metadata". The metadata includes the longitude, latitude, and speed of the vehicle at each frame.

We also need to define the vector on which we will run queries. Press Add Vector, and create a vector [bdd-video, bdd-metadata]:
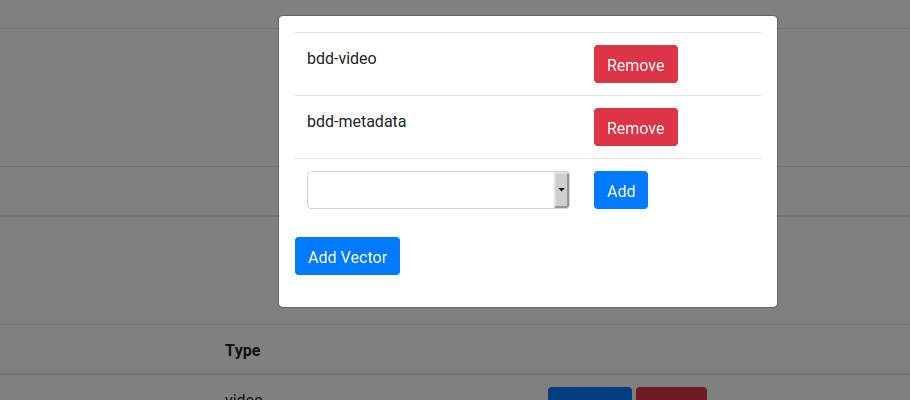
Let's make sure the data is imported properly by visualizing it.
- Go to Queries and create a new query.
- Under Predicate and Rendering, add Input 0 to the output rendering.
- From Explore, run your query on [bdd-video, bdd-metadata].
You should see outputs like this, where few samples contain lane changes:

Filter by Speed
To make things easier, because lane changes on residential roads is less well defined, let's focus on highway driving by only selecting video samples where the speed is at least 20 m/s.
- Go back to Queries, and press New Node: add a Python node with Integer output type.
- Press Add Input to add a second input, and then select the Python node and add "Input 1", which corresponds to bdd-metadata, as a parent.
The query graph now looks like this:
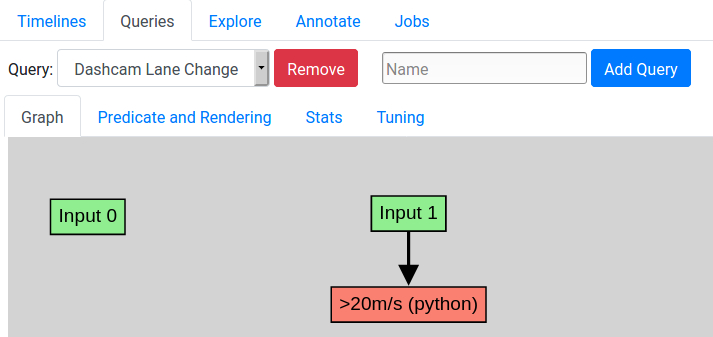
Now, select the Python node and press Edit Node, and then enter the code below and press Save:
import json
@lib.all_decorate
def f(strs):
    decoded = [json.loads(str) for str in strs]
    speeds = [x.get('speed', 0.0) for x in decoded]
    min_speed = min(speeds)
    if min_speed > 20.0:
        return [1]
    else:
        return [0]
This Python function will decode the metadata, and outputs 0 if the speed during the video sample is every below 20 m/s, and 1 otherwise.
Let's now test the query with the predicate. Set the node as the predicate in Predicate and Rendering, and run the query again. Now you should only get outputs with highway driving:

Detect Lane Markings
To detect samples with lane changes, we will first detect lane markings, and then post-process those detections to see if they shift horizontally, which suggests that the car may have changed lanes. This approach should be more effective than directly training an activity recognition model to classify whether or not a video sample contains a lane change event.
We have already annotated many video frames with detections where the lines between lanes meet the camera frame. To import these detections:
- Download our export at https://favyen.com/vaas-data/bdd-lanes-export.zip.
- Import this using "Import Timeline from Export" as you did with bdd-subset-export.zip.
- As before, select the import, and create a new vector [bdd-video, exec-good-35]. The latter series contains the detection annotations.
- If you want to visualize the detections, you could create a new query with two inputs that renders both inputs. So it would overlay the detections on the images.
Next, add a YOLOv3 object detection model to the query graph by pressing New Node, selecting YOLOv3 (from Models), and then adding Input 0 as its parent:

Note: it may make more sense here to use a segmentation model, but YOLOv3 will work for our purposes.
Before proceeding, we need to grab a special YOLOv3 configuration file that we will use to train a new YOLOv3 model for detecting lanes. This is required because the default configuration file is for 80 classes (types) but we will only detect 1 object class.
- Download the configuration file from https://favyen.com/vaas-data/yolov3-oneclass.cfg.
- If you're using Docker, you need to add the file to the container's filesystem. To do so, run
docker container lsto get the container ID, and then rundocker cp yolov3-oneclass.cfg CTID:/yolov3-oneclass.cfg, replacing CTID with the container ID. You can usedocker exec -it CTID bashto open a bash shell in the container to verify things look okay.
OK, now let's train a YOLOv3 model. Select your YOLOv3 node, press Edit Node, and train with a 320x192 input (other input resolutions may work, but that's what we tested with). So the settings should look like this:
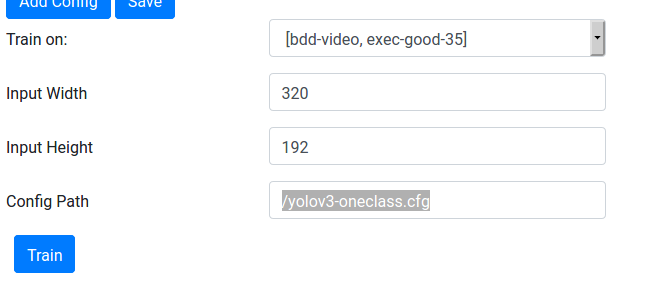
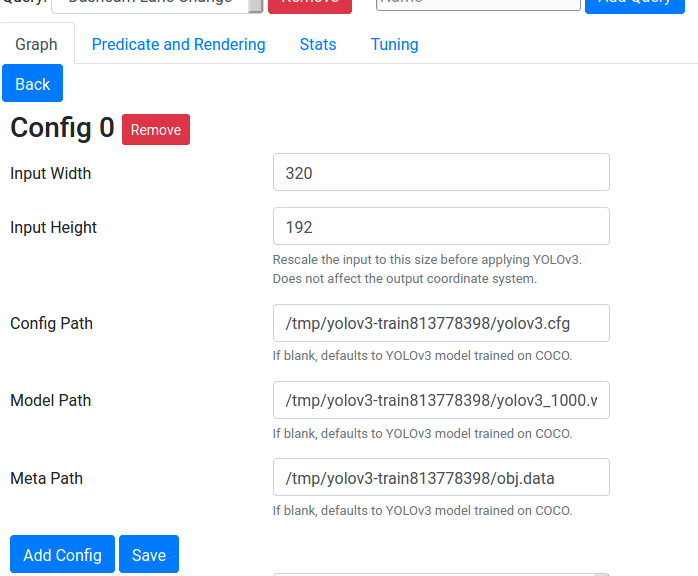
You can monitor the training progress from Jobs. Once it completes, the detector node configuration should be automatically populated, and may look similar to this:
Finally, add the detector to the output rendering and re-run the query. You should now see videos with detections:

Find Lane Changes
Now, we will try to post-process the lane marker detections to determine whether or not a video sample has a lane change event. To do so, let's focus on the marker detected just left of the center of the video, which should usually correspond to the left side of the car's current lane. When the car changes lanes to the left, we expect that position to first shift towards the center of the camera frame (the camera moves left so the marker moves right), but once it passes the center, the position should jump to the left side of the new lane. There is a similar jump when changing lanes to the right.
Add a new Python node to the query with Integer output type, set the YOLOv3 model as the parent, and enter this script that implements the logic above:
import numpy
@lib.all_decorate
def f(detections):
    # compute the median position every 1 sec of detections
    # use the detection just left of the center of the frame
    batch_x = []
    for frame_idx in range(0, len(detections)-24, 25):
        batch = detections[frame_idx:frame_idx+25]
        x_list = []
        for dlist in batch:
            if dlist is None or dlist['Detections'] is None:
                continue
            best_x = None
            for d in dlist['Detections']:
                if d['left'] > 320//2:
                    continue
                if best_x is None or d['left'] > best_x:
                    best_x = d['left']
            if best_x is None:
                continue
            x_list.append(best_x)
        if len(x_list) < 10:
            continue
        batch_x.append(numpy.median(x_list))

    # see if the median changes by more than 200 px
    found = False
    for i in range(1, len(batch_x)):
        if abs(batch_x[i-1] - batch_x[i]) > 200 * 320//1280:
            found = True
            break
    if found:
        return [1]
    else:
        return [0]
Now we have two predicates, the speed filter and the lane change predicate. We need to combine them together. To do so, create a new Boolean Expression node (under Miscellaneous). Make the speed filter the first parent, and the lane change predicate the second parent, since the parents are currently always evaluated from left to right without automatic optimization. Currently boolean expression is always AND so the node does not need to be edited.
The graph looks like this:
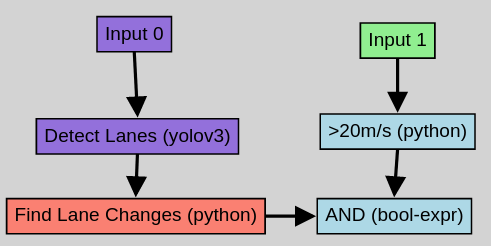
After running the query, most of the samples should now contain lane change events!